NFS
NFS(NetworkFileSystem)即网络文件系统,是Linux/Unix支持的文件系统中的一种,它允许网络中的计算机之间通过TCP/IP网络共享资源。在NFS的应用中,本地NFS的客户端应用可以透明地读写位于远端NFS服务器上的文件,就像访问本地文件一样。
NFS 的基本原则是“容许不同的客户端及服务端通过一组RPC分享相同的文件系统”,它是独立于操作系统,容许不同硬件及操作系统的系统共同进行文件的分享。
NFS在文件传送或信息传送过程中依赖于RPC协议。RPC,远程过程调用 (Remote Procedure Call) 是能使客户端执行其他系统中程序的一种机制。NFS本身是没有提供信息传输的协议和功能的,但NFS却能让我们通过网络进行资料的分享,这是因为NFS使用了一些其它的传输协议。而这些传输协议用到这个RPC功能的。可以说NFS本身就是使用RPC的一个程序。或者说NFS也是一个RPC SERVER。所以只要用到NFS的地方都要启动RPC服务,不论是NFS SERVER或者NFS CLIENT。这样SERVER和CLIENT才能通过RPC来实现PROGRAM PORT(centos5之前,之后是rpcbind)的对应。可以这么理解RPC和NFS的关系:NFS是一个文件系统,而RPC是负责信息的传输。
NFS服务端(示例ip:192.168.0.240)
1 安装nfs
[root@nfs_server ~]# yum -y install nfs-utils rpcbind(小提示:在安装完nfs-utils后,rpcbind默认是启动了的。)
2 enable services。设置开机启动nfs相关服务。
[root@nfs_server ~]# systemctl enable rpcbind
[root@nfs_server ~]# systemctl enable nfs-server
Created symlink from /etc/systemd/system/multi-user.target.wants/nfs-server.service to /usr/lib/systemd/system/nfs-server.service.
[root@nfs_server ~]# systemctl enable nfs-lock
[root@nfs_server ~]# systemctl enable nfs-idmap
3 启动nfs service
[root@nfs_server ~]# systemctl start rpcbind
[root@nfs_server ~]# systemctl start nfs-server
[root@nfs_server ~]# systemctl start nfs-lock
[root@nfs_server ~]# systemctl start nfs-idmap
4 创建需要共享的目录
[root@nfs_server ~]# mkdir -p /application/share                    -p 级联创建
[root@nfs_server ~]# chmod -R 777 /application/share       更改share文件夹及其子文件夹权限为777
5 配置需要共享的目录到 /etc/exports下,xxx.xxx.xxx.xxx为需要共享的对象ip地址。
[root@nfs_server ~]# echo "/application/share 192.168.0.*(rw,sync,no_root_squash)" >> /etc/exports
[root@nfs_server ~]# exportfs -a          使exports的修改生效
或者
[root@nfs_server ~]# echo "/application/share 192.168.0.0/24(rw,sync,no_root_squash)" >> /etc/exports
[root@nfs_server ~]# exportfs -a          使exports的修改生效
[root@nfs_server ~]# echo "/application/share 192.168.0.*(rw,sync,no_root_squash)" >> /etc/exports
[root@nfs_server ~]# exportfs -a
[root@nfs_server ~]# more /etc/exports
/application/share 192.168.0.*(rw,sync,no_root_squash)6 检查共享目录是否设置正确
[root@nfs_server /]# showmount -e
Export list for nfs_server:
/application/share 192.168.0.*
7 调整防火墙配置
[root@nfs_server ~]# firewall-cmd --add-service=nfs --permanent --zone=public
success
[root@nfs_server ~]# firewall-cmd --add-service=mountd --permanent --zone=public
success
[root@nfs_server ~]# firewall-cmd --add-service=rpc-bind --permanent --zone=public
success
[root@nfs_server ~]# firewall-cmd --reload   重新载入配置,使其生效
success
可使用 命令 iptables -L -n 查看开放的端口
在修改防火墙配置前,nfs_server这台机器上开放的端口信息
修改防火墙配置后,nfs_server这台机器上开放的端口信息
NFS客户端
注意:客户端不需要启动nfs服务
1 安装nfs
[root@nfs_client ~]# yum -y install nfs-utils2 检查共享目录是否设置正确,xxx.xxx.xxx.xxx 为共享服务器地址
[root@nfs_client ~]# showmount -e 192.168.0.240
Export list for 192.168.0.240:
/application/share 192.168.0.*
3 挂载远程服务器NFS分区到本地挂载点
make mount points
[root@nfs_client ~]# mkdir -p /application/sharemount nfs
[root@nfs_client ~]# mount -t nfs 192.168.0.240:/application/share /application/share挂载格式解读:
mount -t nfs -o nolock,vers=2 10.0.0.147:/work/nfs /mnt解释一下:
mount :挂载命令
nfs :使用的协议
nolock :不阻塞
vers : 使用的NFS版本号
IP : NFS服务器的IP(NFS服务器运行在哪个系统上,就是哪个系统的IP)
/work/nfs: 要挂载的目录(Ubuntu的目录)
/mnt : 要挂载到的目录(开发板上的目录,注意挂载成功后,/mnt下原有数据将会被隐藏,无法找到)
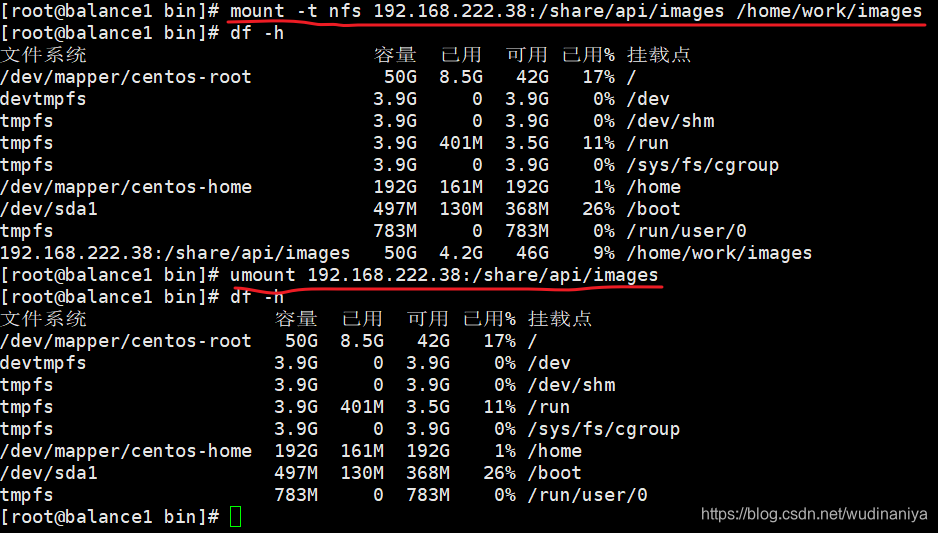
取消挂载(先df -h 查看分区挂载情况)
[root@localhost local]# umount 192.168.0.240:/application/share取消挂载示例2:
取消挂载方式1
挂载
mount -t nfs 192.168.222.38:/share/api/images /home/work/images取消挂载
umount 192.168.222.38:/share/api/images
取消挂载方式2:
挂载
mount -t nfs 192.168.222.38:/share/api/images /home/work/images取消挂载
umount /home/work/images
验证nfs网络文件共享是否成功:
切换到nfs_server端:
[root@nfs_server ~]# cd /application/share/
[root@nfs_server share]# ls
[root@nfs_server share]# touch a.txt
切换到nfs_client端:
查看挂载是否成功,即查看是否在被挂载目录下,同步生成了 a.txt文件
[root@nfs_client ~]# mkdir -p /application/share
[root@nfs_client ~]# mount -t nfs 192.168.0.240:/application/share /application/share
[root@nfs_client ~]# cd /application/share/
[root@nfs_client share]# ls
a.txt
可看到在nfs客户端同步生成了a.txt
在客户端使用命令df查看整个的挂载情况
[root@nfs_client etc]# df
Filesystem                       1K-blocks    Used Available Use% Mounted on
/dev/mapper/centos-root           49250820 2996840  46253980   7% /
devtmpfs                            920376       0    920376   0% /dev
tmpfs                               932652       0    932652   0% /dev/shm
tmpfs                               932652    9748    922904   2% /run
tmpfs                               932652       0    932652   0% /sys/fs/cgroup
/dev/sda1                          1038336  147844    890492  15% /boot
tmpfs                               186532       0    186532   0% /run/user/0
192.168.0.240:/application/share  49251072 1796096  47454976   4% /application/share
注意:
若服务端挂了,则客户端将无法使用
服务端若设置了开机启动,则每次重启后,服务仍然活着
客户端重启后,需要重新挂载
重启服务器后,查看服务端状态如下:
配置客户端开机自动挂载nfs共享目录
vi /etc/fstab
添加 192.168.0.240:/application/share /application/share nfs defaults 0 0
以下内容与nfs无关:
chmod +x 和 chmod -x 的区别:
-rw-r--r--.  1 root root  474 Jul 19 13:23 rc.local

[root@nfs_client rc.d]# chmod +x /etc/rc.d/rc.local      # 给rc.local 增加运行权限

-rwxr-xr-x.  1 root root  474 Jul 19 13:23 rc.local

[root@nfs_client rc.d]# chmod -x /etc/rc.d/rc.local       # 除去rc.local 的运行权限

-rw-r--r--.  1 root root  474 Jul 19 13:23 rc.local
如果使用nginx+nfs+tomcat,报403解决方案:
step 1: 将nfs共享目录的用户和组设为root
由于上传的文件对不同组用户没有读权限,所以只能更改nfs所属的用户和组,即配置nfs时,追加参数 no_root_squash
/usr/local/static 192.168.0.*(rw,sync,no_root_squash)no_root_squash:NFS客户端连接服务端时如果使用的是root的话,那么对服务端分享的目录来说,也拥有root权限。
step 2: 修改nginx访问者的用户和组为root(nginx.conf中配置)
nginx修改用户和组:
user root root; # 或者 user root;
转载自:https://blog.csdn.net/wudinaniya/article/details/81068518
ISCSI
#服务端
dd if=/dev/vda1 of=/iscsi_disks/disk01.img bs=1024k count=40960  #创建虚拟磁盘
yum install -y targetcli
mkdir /iscsi_disks/
targetcli
#如果是用文件镜像
backstores/fileio/create disk01 /iscsi_disks/disk01.img 40G
#如果是用一块空硬盘
cd backstores/block/
create disk /dev/sdb
#设置iqn串
cd /iscsi
create iqn.2015-11.local.example:lin25
#使用磁盘
cd iqn.2015-11.local.example.lin25-target/tpg1/luns
create /backstores/block/disk
#设置initiator名称
cd ../acls/
create iqn.2015-11.local.example:lin01
cd iqn.2015-11.local.example:lin01
#设置CHAP认证账户-可选
set auth userid=username
set auth password=password
#设置监听地址-可选
cd iqn.2015-11.local.example.lin25/tpg1/portals/
delete 0.0.0.0 3260
create 192.168.1.76 3260
exit
systemctl restart target
systemctl enable target
#客户端
yum install -y iscsi-initiator-utils
vi /etc/iscsi/initiatorname.iscsi
InitiatorName=iqn.2015-11.local.example:lin01
vi /etc/iscsi/iscsid.conf
node.session.auth.authmethod = CHAP
node.session.auth.username = username
node.session.auth.password = password
#连接target
iscsiadm -m discovery -t sendtargets -p lin25.example.local
iscsiadm -m node -T iqn.2015-11.local.example:lin25 -l
iscsiadm -m node -T iqn.2015-11.local.example:lin25 -u
cat /proc/partitions
parted --script /dev/sdb "mklabel msdos"
parted --script /dev/sdb "mkpart primary 0% 100%"
mkfs.xfs -i size=1024 -s size=4096 /dev/sdb1转载自:https://blog.51cto.com/eafan/1712620


 AliPay
 VxPay
VxPay QQPay
QQPay


0 条评论